My Favorite Easy Vegan Pan-Fried Buns Recipe
Hello, friends! I’m so excited to share one of my favorite recipes with you—vegan pan-fried buns filled with a delicious vegetable mix. These buns are crispy on the bottom, soft and fluffy inside, and packed full of tasty fillings you’ll love. They’re perfect for a cozy night in, a fun appetizer, or even a shareable snack when friends come over. Plus, making them from scratch is easier than you might think!
Why You’ll Love These Vegan Buns
Not only are they full of fresh veggies, but these buns bring a great combo of textures—crispy, chewy, and juicy all in one bite. Since they’re vegan, they’re light and nourishing without any heavy fats or animal products. And because you get to control what’s inside, you can adjust the seasoning or swap veggies to fit your taste or what you have on hand.
Nutritional Benefits
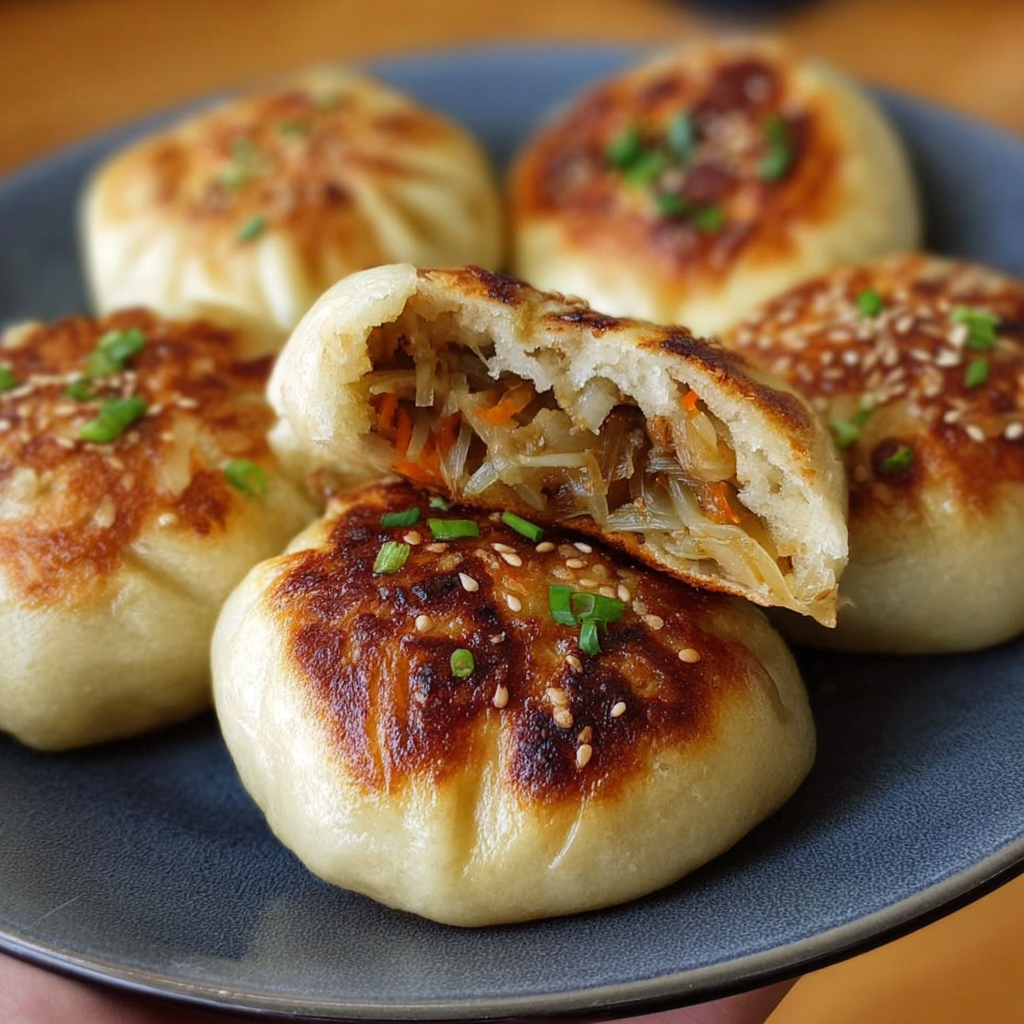
These buns are a great way to sneak more veggies into your day. With carrots, bean sprouts, scallions, and mushrooms, you’re getting a nice boost of vitamins A and C, antioxidants, and fiber. Mushrooms bring a little earthy flavor and some vitamin D, while bean sprouts add crunch and lots of plant-based protein. Plus, using whole, simple ingredients means no weird additives—just tasty, honest food.
Here’s How to Make Vegan Pan-Fried Buns Step-by-Step
Ingredients You’ll Need
- For the dough: 2 cups all-purpose flour, 3/4 cup warm water, 1 tsp instant yeast, 1 tsp sugar, 1/2 tsp salt, 1 tbsp vegetable oil
- For the filling: 1/2 cup shredded carrots, 1/2 cup bean sprouts, 1/2 cup chopped scallions, 1/2 cup diced mushrooms (shiitake or button), 2 cloves garlic (minced), 1 tsp ginger (minced), 1 tbsp soy sauce, 1 tsp sesame oil, salt and pepper to taste
- For cooking and topping: 2-3 tbsp vegetable oil (for frying), white sesame seeds (for sprinkling)
- Dipping sauce: 3 tbsp soy sauce, 1 tbsp rice vinegar, 1 tsp sesame oil, 1 tbsp chopped green onion, optional chili flakes or chopped fresh chili, pinch of sugar
Let’s Cook!
- First, activate your yeast by combining warm water, sugar, and instant yeast in a small bowl. Let it sit for 5 to 10 minutes until it gets frothy—that means the yeast is alive and ready!
- Mix your flour and salt in a large bowl. Pour in that frothy yeast mix and vegetable oil. Stir it all together, then knead the dough on a floured surface for 8 to 10 minutes until it feels smooth and elastic.
- Pop the dough into a lightly oiled bowl, cover it, and let it rise in a warm spot for about 1 to 1.5 hours, or until it’s doubled in size.
- While the dough is rising, start on your filling. Heat 1 tablespoon of vegetable oil in a pan over medium heat. Add minced garlic and ginger, cooking until you smell that delicious fragrance.
- Add the mushrooms and cook until they soften. Then toss in shredded carrots, bean sprouts, and scallions. Season with soy sauce, sesame oil, salt, and pepper. Cook for a few more minutes until the veggies are tender but still have a bit of crunch. Remove from heat and let cool.
- Once your dough has risen, punch it down and divide it into 8 equal balls. Flatten each ball into a circle.
- Place 1-2 tablespoons of vegetable filling in the center of each circle. Carefully fold the edges over the filling, pinching them tightly to seal the bun. Sprinkle sesame seeds on top and gently press so they stick.
- Heat 2 tablespoons of vegetable oil in a non-stick skillet over medium heat. Place the buns in the pan with the sealed side down. Fry for 2 to 3 minutes, until the bottoms are golden and crispy.
- Carefully add 1/4 cup of water to the pan and cover immediately with a lid to steam the buns for 6 to 8 minutes, until they’re fully cooked and fluffy.
- Remove the lid and cook for an extra minute if you want the bottoms extra crispy. Then transfer your buns to a plate.
- Mix up the dipping sauce by combining soy sauce, rice vinegar, sesame oil, chopped green onion, a pinch of sugar, and chili flakes or fresh chili if you like a bit of heat.
- Serve your buns hot with the dipping sauce on the side and enjoy every bite!
Helpful Tips for Perfect Buns
- Dough Rising: Make sure your water isn’t too hot when activating yeast—it should be warm, like a cozy bath. Too hot can kill the yeast!
- Sealing the Buns: Take your time pinching the dough so the filling stays inside while cooking. If you want, moisten the edges with a little water to help seal better.
- Cooking Tip: When steaming, adding water to the pan quickly and covering it traps steam perfectly. Use a lid that fits well to keep the buns moist inside.
- Storage: Leftover buns taste great chilled. Refrigerate in an airtight container for 1-2 days, or freeze for up to a month. Reheat by pan-frying again or steaming gently.
- Serving: These buns pair beautifully with a fresh cucumber salad or simple miso soup to make it a full meal.
What You’ll Need to Make These Buns
- Mixing bowls
- Measuring cups and spoons
- Non-stick skillet with a lid
- Spatula or tongs for flipping
- Rolling pin or something to flatten the dough (a wine bottle works in a pinch!)
- Knife and cutting board for your veggies
- Small bowl for activating yeast
- Plate for resting the cooked buns
Top 5 Questions About Vegan Pan-Fried Buns
- Can I make the dough ahead of time? Absolutely! You can prepare the dough the night before, keep it in the fridge covered, and let it come to room temperature before shaping and cooking.
- What if I don’t have instant yeast? You can use active dry yeast, but you’ll need to proof it in warm water first for about 10 minutes before mixing it with the flour.
- Can I bake these buns instead of pan-frying? Yes, you can! Bake at 375°F (190°C) for about 15-20 minutes until golden, but you’ll miss out on that lovely crispy bottom.
- Can I swap vegetables in the filling? Totally! You can use cabbage, bell peppers, or tofu crumbles for extra protein—just adjust the seasonings to keep it tasty.
- How spicy is the dipping sauce? It’s mild by default, but you can add as much chili as you like to make it as spicy as you want.
Let’s Connect and Share!
If you give these vegan pan-fried buns a try, I would LOVE to hear how it went! Snap some pictures, share your tweaks or favorite fillings, and pin this recipe on Pinterest so others can enjoy it too. Cooking is always more fun when we share the love. Happy cooking!