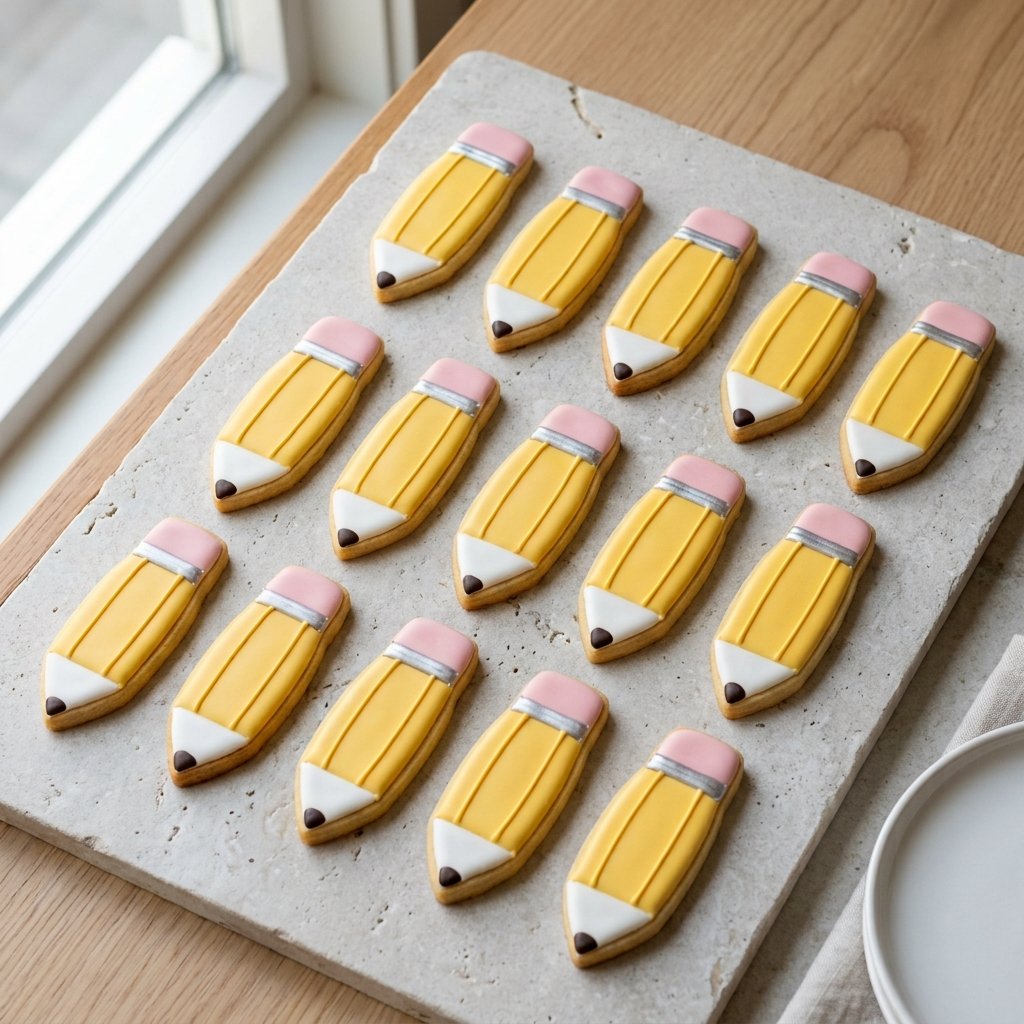
If you’re looking for adorable back to school cookies that are actually easy to make, these pencil sugar cookies are one of my favorite first-day treats. They’re cheerful, kid-friendly, and surprisingly doable, even if you don’t usually make decorated cookies. With a soft sugar cookie base, bright yellow icing, a pink “eraser,” and a simple pointed tip, they really do look like little pencils in the sweetest way.
I love making these for the first day of school because they feel special without being fussy. You can pack them into lunchboxes, serve them at a classroom celebration, or wrap a few up for teachers and neighbors. They have that classic buttery sugar cookie flavor everyone loves, but the pencil shape gives them a playful back-to-school twist that instantly makes people smile.
The best part is that I designed this recipe to keep things simple. The dough is straightforward, the shape is easy to cut, and the decorating is more about neat color blocking than complicated piping skills. If you want a fun baking project to kick off the school year, this is the one I’d tell you to start with.
| Prep time | 25 minutes |
| Cook time | 10 minutes |
| Total time | 1 hour 5 minutes |
| Servings | 18 cookies |
| Difficulty | Easy |
Why You’ll Love It
- The pencil design is instantly recognizable and perfect for first day of school parties and lunchbox treats.
- The dough is simple, dependable, and easy to roll and cut into neat shapes.
- The decorating looks impressive, but it uses basic icing and straightforward sections of color.
- These cookies hold their shape well, so the finished “pencil” look stays crisp after baking.
- You can make them ahead, which is a lifesaver during busy back-to-school week.
- Kids love helping with the icing, especially the pink eraser and little chocolate tip.
Nutritional Benefits and Adaptable Variations
A sweet treat with simple pantry ingredients
These cookies are meant to be a fun dessert, not a health food, but I still appreciate that they’re made with familiar baking basics like flour, butter, eggs, and vanilla. Making them at home lets you control the ingredient quality, sweetness level in the icing, and portion size. They’re a nice occasional treat for celebrating the start of the school year in a homemade way.
Easy ways to adapt them
You can swap almond extract for part of the vanilla if you like a bakery-style sugar cookie flavor. If you need a simpler finish, skip the piping bag and spread the icing with a small spoon or offset spatula. For a different color palette, you can make classic school-bus yellow pencils or go with softer pastel shades for a cute classroom party dessert table. You can also use mini chocolate chips or a small dab of melted chocolate to create the pencil point.
Ingredients
For the sugar cookies
- 2 3/4 cups all-purpose flour
- 1 teaspoon baking powder
- 1/2 teaspoon salt
- 1 cup unsalted butter, softened
- 1 cup granulated sugar
- 1 large egg
- 2 teaspoons vanilla extract
For the icing and decoration
- 2 1/2 cups powdered sugar
- 4 to 5 tablespoons milk
- 2 tablespoons light corn syrup
- 1/2 teaspoon vanilla extract
- Yellow food coloring
- Pink food coloring
- Mini chocolate chips or a little melted chocolate for the pencil tip
Step-by-Step Instructions
[INSERT PROCESS IMAGE HERE]
- In a medium bowl, whisk together the flour, baking powder, and salt. Set the dry mixture aside so it’s ready to add later.
- In a large bowl, beat the softened butter and granulated sugar until light and creamy. Mix in the egg and vanilla until smooth.
- Add the dry ingredients to the wet ingredients and mix just until a soft dough forms. If the dough feels sticky, that’s normal, but it should still hold together well.
- Divide the dough in half, flatten each half into a disk, and chill for 20 minutes. This makes rolling and cutting much easier and helps the cookies keep their shape.
- Preheat your oven to 350°F. Line baking sheets with parchment paper.
- On a lightly floured surface, roll the dough to about 1/4-inch thick. Cut rectangles about 4 inches long and trim one end into a point to make simple pencil shapes. Transfer them to the prepared baking sheets with a little space between each cookie.
- Bake for 8 to 10 minutes, or until the edges are just set and the tops no longer look wet. Try not to let them brown too much if you want a clean, bright finished look.
- Cool the cookies on the baking sheet for 5 minutes, then transfer them to a wire rack and let them cool completely before icing.
- To make the icing, whisk together the powdered sugar, 4 tablespoons milk, corn syrup, and vanilla until smooth. Add a little more milk only if needed. You want an icing that spreads easily but still holds its shape.
- Divide the icing into three small bowls. Tint one bowl yellow, one pink, and leave one white.
- Decorate each cookie in sections: yellow across the center for the pencil body, pink on one short end for the eraser, and white on the pointed end. Leave a tiny spot at the tip for chocolate.
- Finish with a mini chocolate chip or a dab of melted chocolate at the very tip to mimic pencil lead. Let the icing set completely before stacking or packaging the cookies.
Tips, Serving Suggestions & Substitutions
Best tip for success
Chill the dough before rolling and make sure the cookies are completely cool before decorating. Those two small steps make the biggest difference in clean shapes and neat icing.
Serving suggestions
These are perfect on a first day of school dessert tray with apple slices, pretzels, and mini cupcakes. I also love slipping one into a lunchbox as a surprise or wrapping a few in clear treat bags for teachers, classmates, or after-school snacks.
Simple substitutions
If you don’t want to use corn syrup in the icing, you can leave it out, though the shine may be a little less smooth. If mini chocolate chips feel too large for the tip, use melted chocolate and dot it on with a toothpick. You can also use store-bought decorating icing in yellow, pink, and white if you want to save time.
Nutrition Information
| Calories | 210 | Carbohydrates | 31g |
| Protein | 2g | Fat | 9g |
| Saturated fat | 5g | Sugar | 18g |
| Sodium | 85mg | Fiber | 0g |
Nutrition values are approximate estimates per cookie and can vary based on exact ingredients and decorating amount.
Storage & Make-Ahead Tips
Room temperature: Store the fully set cookies in an airtight container at room temperature for up to 4 days. Separate layers with parchment if needed to protect the icing.
Make ahead: You can make the dough up to 2 days ahead and keep it wrapped in the refrigerator. Let it sit for a few minutes at room temperature if it feels too firm to roll.
Freezing: The undecorated baked cookies freeze well for up to 2 months in a tightly wrapped container. Thaw at room temperature, then decorate once completely dry and cool.
FAQ
1. Can I use store-bought sugar cookie dough?
Yes, you can if you need a shortcut. Just choose a dough that rolls out well, and chill it if necessary before cutting the pencil shapes.
2. How do I keep the pencil cookies from spreading too much?
Chilling the dough is the key. If your kitchen is warm, you can even chill the cut cookies on the baking sheet for 10 minutes before baking.
3. Do I need piping bags for the icing?
Not at all. Piping bags can help with sharper edges, but you can also use small zip-top bags with the corner snipped off, or simply spread the icing carefully with a spoon.
4. Can kids help decorate these?
Absolutely. This is a great recipe to make with kids because the design is simple and forgiving. I’d just handle the oven steps yourself and let them help once the cookies are cooled.
5. How far in advance can I make them for a school event?
You can bake them 2 to 3 days ahead and decorate them 1 to 2 days before serving. Just let the icing set fully before storing them in layers.
Final Thoughts
These pencil sugar cookies are such a fun way to celebrate a new school year, and I honestly think they’re one of the cutest back to school cookies you can make without a lot of stress. If you try them, I’d love to hear how they turned out for you. Feel free to leave a comment, share the recipe with a fellow school-season baker, and save it to Pinterest for your first day of school plans.
Best Easy Pencil Sugar Cookies for First Day of School
Ingredients
Equipment
Method
- Whisk together the flour, baking powder, and salt in a medium bowl.
- In a large bowl, beat the softened butter and granulated sugar until light and creamy. Mix in the egg and vanilla until smooth.
- Add the dry ingredients to the wet ingredients and mix just until a soft dough forms.
- Divide the dough in half, flatten into disks, wrap, and chill for 20 minutes.
- Preheat the oven to 350°F and line baking sheets with parchment paper.
- Roll the dough on a lightly floured surface to about 1/4-inch thick. Cut into rectangles about 4 inches long and trim one end into a point to create pencil shapes.
- Transfer the cookies to the prepared baking sheets and bake for 8 to 10 minutes, until the edges are just set and the tops no longer look wet.
- Cool on the baking sheet for 5 minutes, then transfer to a wire rack and cool completely.
- Whisk together the powdered sugar, 4 tablespoons milk, corn syrup, and vanilla until smooth, adding a little more milk if needed for a spreadable consistency.
- Divide the icing into three bowls. Tint one yellow, one pink, and leave one white.
- Decorate each cookie with yellow icing across the center, pink icing on one short end, and white icing on the pointed end.
- Add a mini chocolate chip or a dab of melted chocolate at the tip to mimic pencil lead. Let the icing set completely before serving or storing.