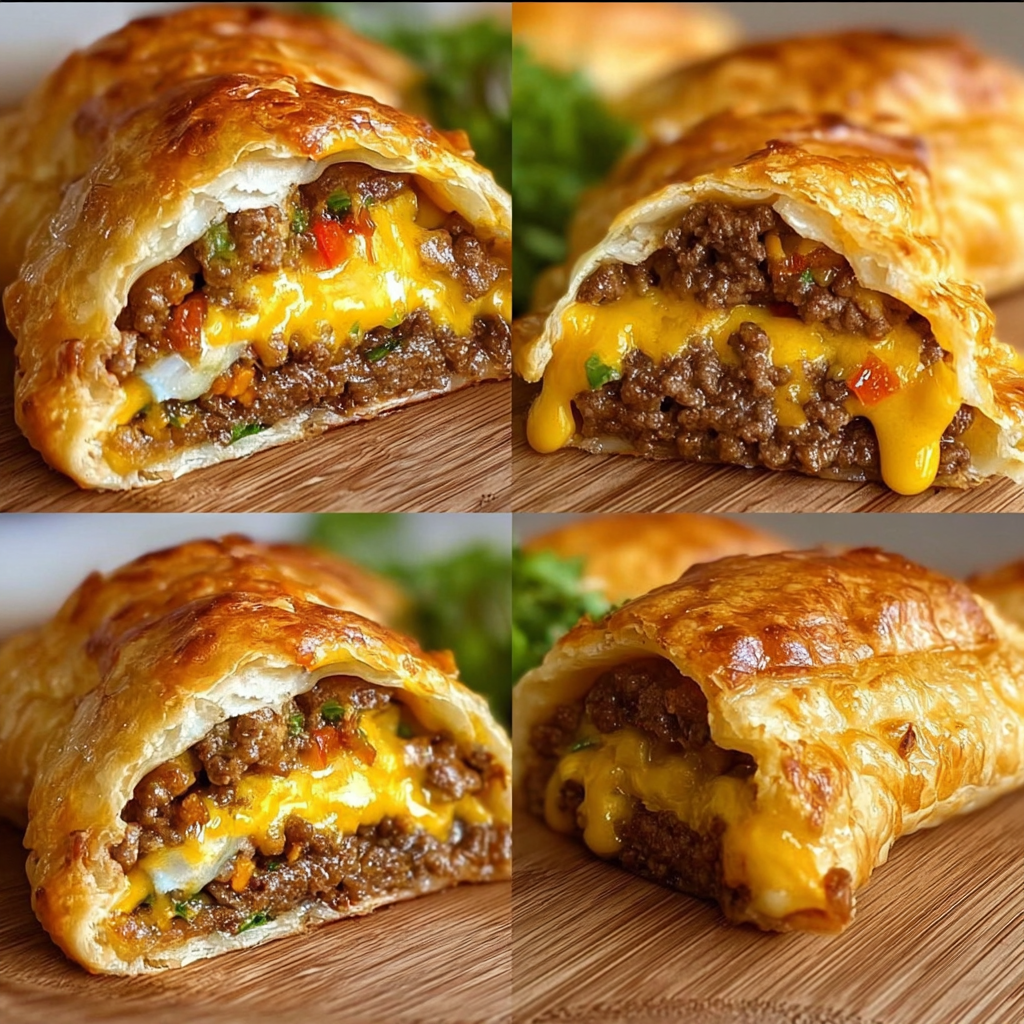
Hey There! Let’s Make Delicious Cheesy Beef Puff Pastry Pockets Together
Hi! If you love the classic flavors of a cheeseburger but want something a bit more fun and fancy, I’ve got just the recipe for you—cheesy beef puff pastry pockets! These little pockets are golden, flaky, and filled with savory ground beef and melted cheddar. I love making these because they’re perfect for sharing at parties, family dinners, or even as a special snack. Plus, they’re pretty simple to put together, and you can feel proud serving up something homemade and delicious.
Why You’ll Love These Puff Pastry Pockets
Besides being mega tasty, these pockets have quite a few benefits. If you’re looking for a fun way to get a good amount of protein in your meal, ground beef is a great choice. Plus, using puff pastry means you get this wonderful, flaky texture without hours of work. I also like that you can control the ingredients—like the seasoning and the cheese—so you can customize them just how you like it.
Simple Swaps and Variations You’ll Enjoy
- Cheese Choices: Don’t have cheddar? No worries! Try mozzarella for a gooey stretch, pepper jack if you want a little spice, or even Swiss cheese for something milder.
- Meat Alternatives: Use ground turkey or chicken for a lighter option, or even a plant-based beef substitute if you want to keep it vegetarian-friendly.
- Add Veggies: Feel free to toss in finely diced bell peppers, mushrooms, or spinach into the beef mix to boost the veggie factor and flavor.
- Herbs & Spices: Try adding a little smoked paprika, chili powder, or dried oregano to the filling for some fun twists.
How to Make Cheesy Beef Puff Pastry Pockets
Ingredients
- 1 package frozen puff pastry sheets, thawed
- 1 lb ground beef
- 1 small onion, finely diced
- 6-8 slices cheddar cheese (or shredded cheddar)
- 1 tsp salt
- ½ tsp black pepper
- ½ tsp garlic powder (optional)
- 1 egg (for egg wash)
- Fresh parsley or thyme, chopped (optional garnish)
Step-by-Step Instructions
- Preheat your oven to 400°F (200°C) and line a baking sheet with parchment paper.
- In a skillet over medium heat, cook the diced onion until it becomes translucent—around 2 to 3 minutes. This step adds a lovely sweetness and softness.
- Add the ground beef to the skillet and cook until it’s browned and fully cooked through, about 6 to 8 minutes. Make sure to break the beef into small pieces as it cooks so it’s easy to fill the pockets. Season with salt, pepper, and garlic powder if you like. Once done, drain any excess grease and set the beef mixture aside to cool a bit.
- On a lightly floured surface, unfold the thawed puff pastry sheets and cut them into squares or rectangles about 4×4 inches—nice little pockets.
- Put a spoonful of the beef mixture right in the center of each square and top it with a slice or a handful of shredded cheddar cheese.
- Fold the pastry over to make a half-moon shape, then press the edges firmly together. For a tidy look and secure seal, crimp the edges with a fork.
- Beat the egg and brush it over the tops of each pocket. This step gives the pastry that gorgeous golden color and shiny finish.
- Place the pockets on your baking sheet and bake for 15 to 20 minutes, or until the pastry has puffed up beautifully and turned a delicious golden brown.
- Let them cool for a few minutes, then sprinkle with chopped parsley or thyme if you want that fresh, pretty touch.
- Serve warm! They’re awesome on their own or with ketchup, mustard, or any cheeseburger sauce you love.
Helpful Tips You’ll Appreciate
- If your puff pastry is too soft or sticky to work with, pop it back into the fridge for 10-15 minutes. Cold pastry is much easier to handle!
- To avoid soggy bottoms, make sure to drain the beef well so there’s no excess grease hiding under the cheese.
- If you want to prep ahead, you can make the pockets and freeze them unbaked on a tray. Once frozen solid, transfer them to a freezer bag. When ready, bake them straight from frozen—just add a few extra minutes to bake time.
- Serving tip: These pockets pair really nicely with a crisp side salad or some roasted veggies to round out your meal.
Equipment You’ll Find Handy
- Baking sheet lined with parchment paper – Keeps the baking easy and mess-free!
- Non-stick skillet – For cooking your beef and onions evenly.
- Rolling pin or your hands – To gently work with the puff pastry if needed.
- Sharp knife or pizza cutter – For cutting the pastry into squares or rectangles.
- Fork – For crimping and sealing the pastry edges tight.
- Basting brush – Perfect for brushing on the egg wash.
Frequently Asked Questions
- Can I use fresh pastry instead of frozen puff pastry?
Absolutely! Just make sure it’s rolled out to the right thickness. The cooking time should be about the same. - What if I want these to be vegetarian?
You can swap the ground beef for cooked lentils, mushrooms, or a plant-based meat substitute. Season well for great flavor! - How long can I store these after baking?
Store cooled pockets in an airtight container in the fridge for up to 3 days. Reheat in the oven to keep that flaky crust crisp. - Is there a way to make these less greasy?
Yes! Use lean ground beef and make sure to drain it very well after cooking. You can also blot excess grease with paper towels. - Can I freeze baked pockets?
You sure can. Let them cool completely, wrap them well, and freeze for up to 2 months. Reheat in the oven for best texture.
Try This Recipe and Share Your Experience!
I hope you love making and eating these cheesy beef puff pastry pockets as much as I do. They’re a total crowd-pleaser and so much fun to bake! If you give this recipe a try, I’d love to hear what you think or see photos of your creations. Don’t forget to pin this recipe on Pinterest to keep it handy and share the love with your friends. Happy baking!