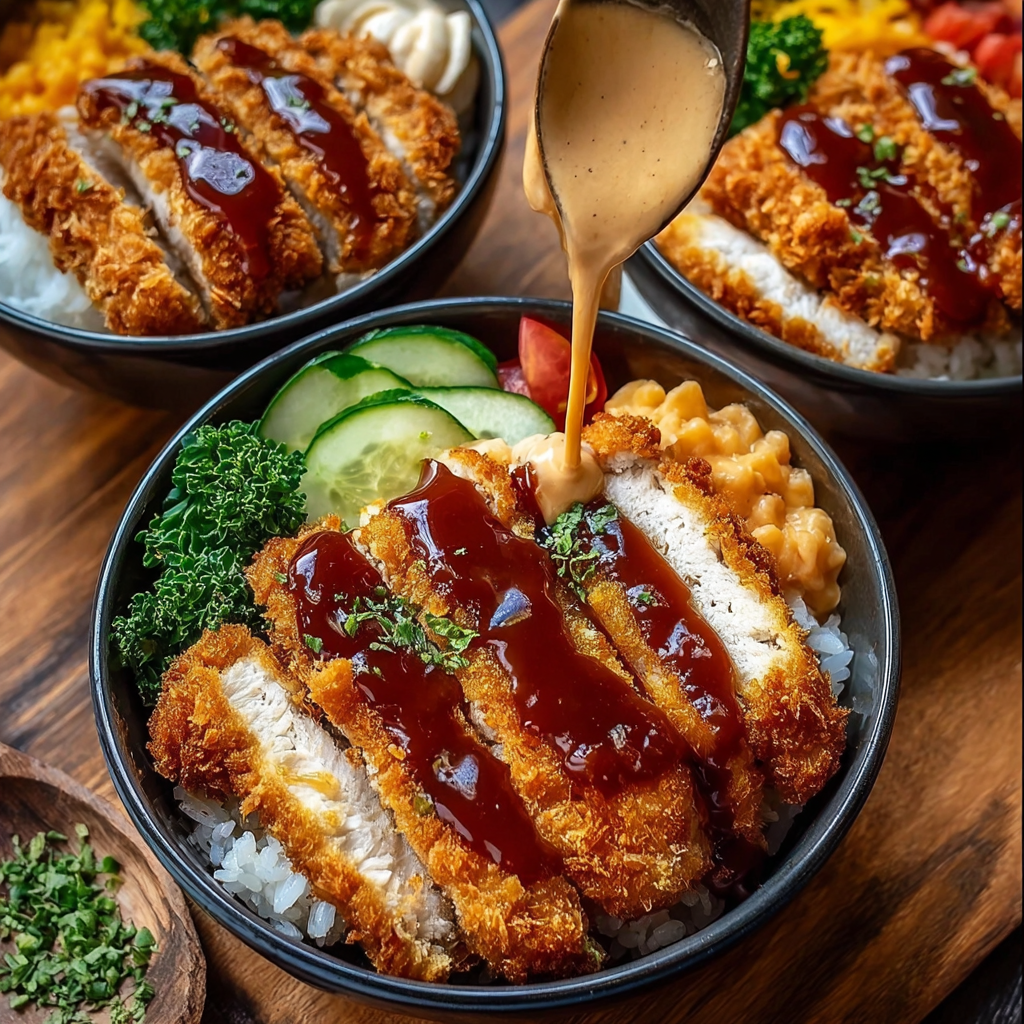
My Favorite Easy Chicken or Pork Katsu Rice Bowl Recipe
Hey there! If you’re craving something crispy, flavorful, and downright satisfying, you’re going to love this Chicken or Pork Katsu Rice Bowl. I personally enjoy making this dish when I want a comforting meal that feels special but isn’t complicated at all. The juicy, breaded cutlets paired with tender Japanese rice and tangy sauces just hit all the right notes for me. Plus, it’s a fun dish you can customize to your liking.
Why This Katsu Rice Bowl Is Such a Winner (Nutritional Benefits)
This dish might feel indulgent — and it is in the best way — but it also packs some good nutrition. The protein from the chicken or pork gives you lasting energy, while the rice offers a gentle source of carbs that keep you fueled. If you use Japanese short-grain rice, it has a good balance of fiber and vitamins. The fresh green onions add a bright, fresh touch with antioxidants, and if you skip or go light on the tonkatsu sauce, it makes the bowl even lighter.
When I want it a little healthier, I serve it with a big side of steamed or pickled veggies (like cucumbers or carrots) which makes the meal balanced and colorful.
How You Can Switch Things Up (Adaptable Variations)
- Meat Options: You can swap chicken breasts or pork cutlets for chicken thighs, tofu cutlets, or even fish fillets if you want to try something different.
- Breading Choices: Feel free to use crushed cornflakes or gluten-free panko breadcrumbs to make it gluten-free or add an extra crunch.
- Sauces: Not a fan of tonkatsu or mayo? Try teriyaki sauce or even a drizzle of spicy sriracha mayo to change up the flavor profile.
- Rice Alternatives: Brown rice or cauliflower rice both make lovely substitutes if you want something more nutrient-dense or low-carb.
Step-by-Step Chicken or Pork Katsu Rice Bowl Recipe
Ingredients You’ll Need
- 2 boneless chicken breasts or pork loin cutlets
- Salt and pepper, to taste
- 1 cup all-purpose flour
- 2 large eggs
- 1.5 cups panko breadcrumbs
- Vegetable oil, for deep frying
- 2 cups cooked Japanese short-grain rice
- 1/2 cup tonkatsu sauce
- 1/4 cup Japanese mayonnaise or spicy mayo (mix mayo with sriracha to taste)
- 3-4 green onions (scallions), finely chopped
- Furikake or Japanese seasoning (optional, for garnish)
Instructions
- Cook the Japanese short-grain rice following the package instructions, then keep it warm for serving.
- Use a meat mallet or rolling pin to pound your chicken breasts or pork cutlets until they are about ½ inch thick and even. Season both sides with salt and pepper.
- Set up your breading station: one shallow dish with flour, one with beaten eggs, and one with panko breadcrumbs.
- Coat each cutlet first in flour (shake off the extra), then dip into beaten eggs, and finally press firmly into the panko breadcrumbs until well coated.
- Heat vegetable oil in a deep pan or pot to 350°F (175°C). Fry the breaded cutlets until golden brown and cooked through, about 4-5 minutes on each side. Use tongs to flip carefully. Once done, place on paper towels to drain excess oil.
- Slice the cooked katsu into strips for easy eating.
- Mix the chopped green onions with a sprinkle of furikake or Japanese seasoning if using, to add extra flavor and texture.
- To assemble your bowl: spoon warm rice into the bottom, place the sliced katsu on top, and add the green onion mixture beside it.
- Drizzle tonkatsu sauce generously over the cutlets, then add dollops of Japanese mayo or spicy mayo around the bowl.
- Serve immediately – chopsticks totally optional but highly recommended!
Helpful Tips For Perfect Katsu Every Time
- Oil Temperature Matters: Keep your oil steady at about 350°F. Too hot, and the outside burns before the inside cooks. Too cool, and it’s greasy.
- Don’t Skip the Pounding: Pounding the meat ensures even cooking and keeps it juicy.
- Make Ahead: You can prepare the katsu earlier and warm it in the oven before serving if you want to save time during mealtime.
- Storage: Leftovers last in the fridge for up to 2 days. Reheat in an oven or air fryer to keep the breading crispy.
- Serving Suggestions: Serve your katsu bowl with pickled veggies, miso soup, or a side salad for a full Japanese-inspired meal.
Equipment You’ll Need
- Meat mallet or rolling pin (for pounding cutlets)
- Three shallow dishes for breading station
- Deep frying pan or pot
- Thermometer (helpful to keep oil temp precise)
- Tongs or slotted spoon (for frying)
- Paper towels (for draining fried cutlets)
- Sharp knife for slicing cutlets
- Rice cooker or pot (for cooking rice)
Frequently Asked Questions
- Can I bake the katsu instead of deep-frying? Yes! For a lighter option, bake breaded cutlets at 400°F (200°C) for about 20-25 minutes, flipping halfway until golden and cooked through.
- What if I can’t find tonkatsu sauce? You can substitute with a mix of ketchup, Worcestershire sauce, and a bit of soy sauce as a homemade version.
- Can I make katsu with chicken thighs? Definitely! Thighs tend to be juicier and can add extra flavor.
- How do I make spicy mayo? Just mix Japanese mayo with sriracha sauce to your preferred heat level.
- Is panko essential? Panko breadcrumbs create that classic super crispy texture. You can substitute with regular breadcrumbs but expect a different crunch.
Ready to Try This Crispy Katsu Bowl?
I hope you give this Chicken or Pork Katsu Rice Bowl a try soon! Nothing beats a warm, crispy meal that you can make easily at home. If you do, please share your photos and thoughts with me on Pinterest—I’d love to see your creations and hear how you made it your own. Happy cooking!