Welcome to Your New Favorite Dessert!
Hey there! If you’re looking to impress your friends or just treat yourself to something truly delightful, you’re in the right place. Today, I’m excited to share my spin on a classic—Tiramisu Chia Pudding! It combines the creamy richness of tiramisu with the healthy benefits of chia seeds. Trust me, once you try this layered dessert, it’s going to be a new staple in your household.
Nutritional Benefits of Tiramisu Chia Pudding
Let’s talk about how this dessert can be both indulgent and nourishing. Chia seeds are small but packed with nutrients—full of fiber and omega-3 fatty acids, they are great for heart health. Using a milk alternative keeps it plant-based, and mascarpone cheese or coconut cream adds creaminess without all the heaviness. Plus, if you’re keeping an eye on sugar levels, you can control the sweetener amount, making it a healthier option overall!
Adaptable Variations
- Dairy-Free Delight: Swap mascarpone cheese with coconut cream or Greek yogurt to keep it dairy-free while still enjoying a rich flavor.
- Flavor Boost: For a bit of a twist, consider adding a splash of coffee liqueur into the coffee pudding for a subtle kick!
- Fruity Fun: Layer in some fresh berries or banana slices between the layers for a delightful contrast and added nutrients.
- Going Nutty: Top with crushed nuts for a little crunch, or use nut butter within the chia mixture if you’re feeling adventurous!
Delicious Tiramisu Chia Pudding Recipe
Ingredients
- 1/3 cup chia seeds
- 1 1/2 cups milk or milk alternative (almond, soy, or oat)
- 1 cup strong brewed coffee or espresso, cooled
- 1/2 cup mascarpone cheese or coconut cream/Greek yogurt for a dairy-free option
- 3 tablespoons cocoa powder (plus extra for dusting)
- 1/4 to 1/3 cup sweetener (maple syrup, honey, or sugar)
- 1 teaspoon vanilla extract
- 2 tablespoons mini dark chocolate chips or crushed espresso nibs
Instructions
- In a bowl or jar, combine the chia seeds with 1 1/2 cups of your chosen milk or milk alternative, 1 tablespoon of sweetener, and the vanilla extract. Stir it well!
- Cover the mixture and pop it in the fridge for at least 3-4 hours or overnight. This is when the magic happens, and it thickens into a pudding consistency. Stir it once or twice after the first 30 minutes—this helps prevent clumping.
- While your chia mix is chilling, let’s prepare the coffee pudding layer. In a separate bowl, mix your brewed coffee, the mascarpone (or your dairy-free option), cocoa powder, and the remaining sweetener until it’s smooth and creamy. Taste as you go and adjust the sweetness to your liking!
- Chill the coffee pudding layer in the refrigerator for about 30 minutes to help it thicken up a bit.
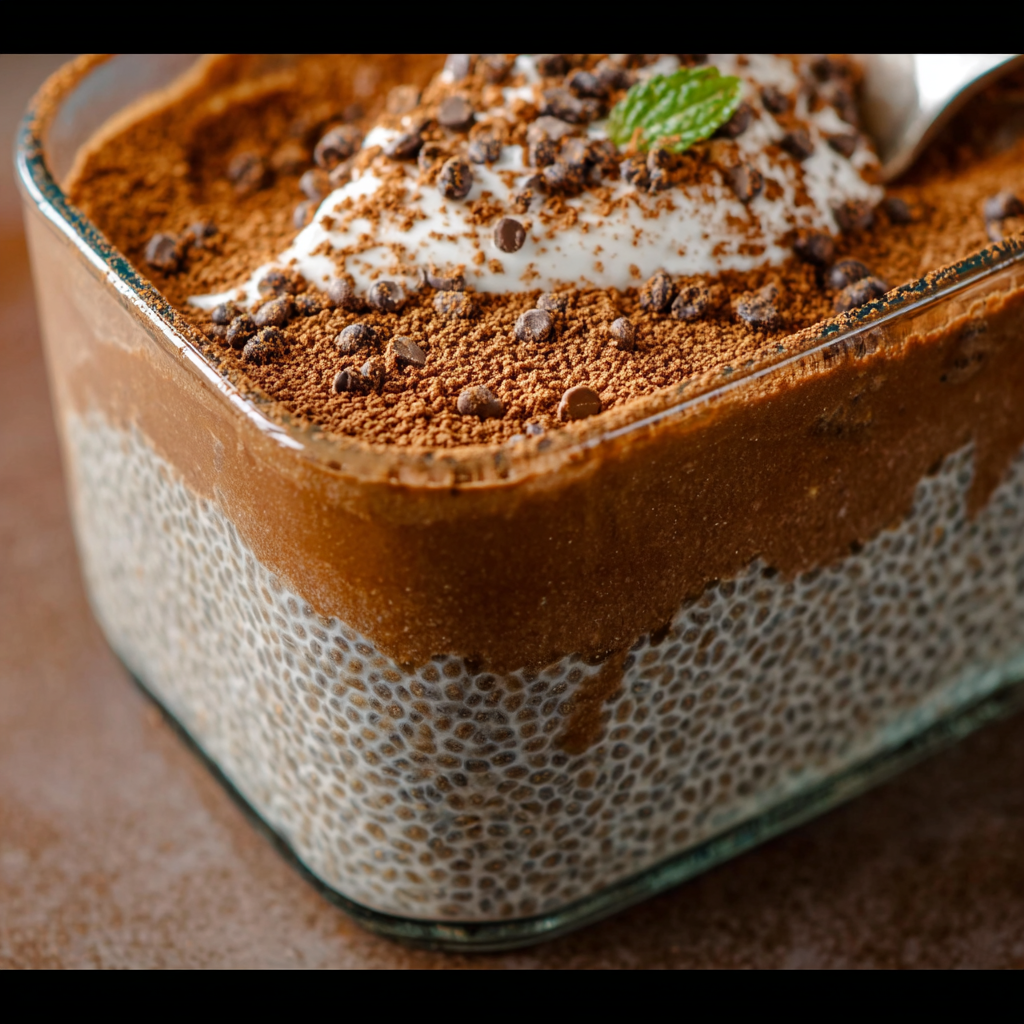
- Now, it’s time to assemble! In a clear serving dish, spread the coffee pudding evenly as the bottom layer.
- Carefully spoon the chilled chia pudding over the coffee layer, smoothing it out so it looks nice and even.
- Dust the top generously with cocoa powder, and sprinkle mini dark chocolate chips or crushed espresso nibs on top for that gorgeous finish.
- Refrigerate the assembled pudding for at least 1 hour before serving—this melt-in-your-mouth dessert needs time to let those flavors blend beautifully!
- Finally, serve it chilled with a spoon, and prepare to enjoy every yummy bite!
Practical & Valuable Tips
- Want to prep ahead? This pudding actually tastes better the next day once the flavors have had time to mix, so don’t hesitate to make it in advance!
- If you have leftovers (though I doubt you will!), keep them in an airtight container in the refrigerator for up to 3 days. Just give it a stir before enjoying again.
- Prepare this treat in individual cups for a fun presentation—everyone loves their own little portion!
- Feel free to play around with the sweetness—everyone’s taste buds are different, so adjust to your liking!
- For a more indulgent experience, serve with a dollop of whipped cream on top.
Equipment Needed
Alright, let’s make sure you have all the tools you need:
- A mixing bowl for the chia pudding
- A whisk or spoon for stirring
- Separate bowls for making the coffee pudding layer
- A clear serving dish or individual cups for layering
- Measuring cups and spoons to get those proportions just right!
Frequently Asked Questions
- Can I use instant coffee instead of brewed coffee? Yes, instant coffee works, just make sure it’s strong enough to give flavor to the pudding!
- How long can I store leftovers? Keep it in an airtight container in the fridge for up to 3 days.
- Can I make the chia pudding without sweetener? Absolutely! The coffee layer will have sweetness from the sweetener you add there.
- Can I use flavored coffee? Of course! A flavored coffee or espresso can add a unique twist to your dessert.
- Is this suitable for kids? Yes, as long as they don’t have any dietary restrictions—just watch for the amount of caffeine if you use espresso!
Let’s Connect!
I hope you enjoy making and indulging in this Tiramisu Chia Pudding as much as I do! I’d love to hear how yours turns out or if you tried any fun variations. Don’t forget to share your experience on Pinterest, and let’s inspire each other with our cooking adventures!