
Your Sushi Bake Adventure!
Hey there, sushi lovers! If you’re like me, you can’t get enough of that delicious, comforting taste of sushi. But what if I told you there’s a way to enjoy your favorite sushi flavors without needing to roll anything at all? Yes, that’s right! Today, I’m super excited to share with you my recipe for a mouthwatering salmon sushi bake. It’s the perfect casual dish for a family gathering or just a fun dinner at home.
Nutritional Benefits of Sushi Bake
Let me tell you, this sushi bake isn’t just tasty—it’s got some great nutritional perks! First off, salmon is rich in omega-3 fatty acids which are fantastic for heart health. Plus, you’ve got creamy avocado in there, which is loaded with healthy fats and fiber. The sushi rice gives you a nice balance of carbs to keep you energized, while a dash of green onions adds a delightful touch along with some vitamins. So not only can you indulge in this delicious dish, but you’re also fueling your body with goodness!
Fun Variations to Make It Your Own
- Spice it Up: If you’re not a huge fan of sriracha, feel free to switch it out for a different hot sauce or even leave it out completely. You could also throw in some chopped jalapeños for a fresh kick!
- Vegetarian Options: No salmon? No problem! You can easily substitute it with roasted vegetables or a bean mixture for a plant-based twist.
- Kick Up the Creaminess: Add some fresh herbs like dill or chives to your cream cheese mixture to give it an extra layer of flavor.
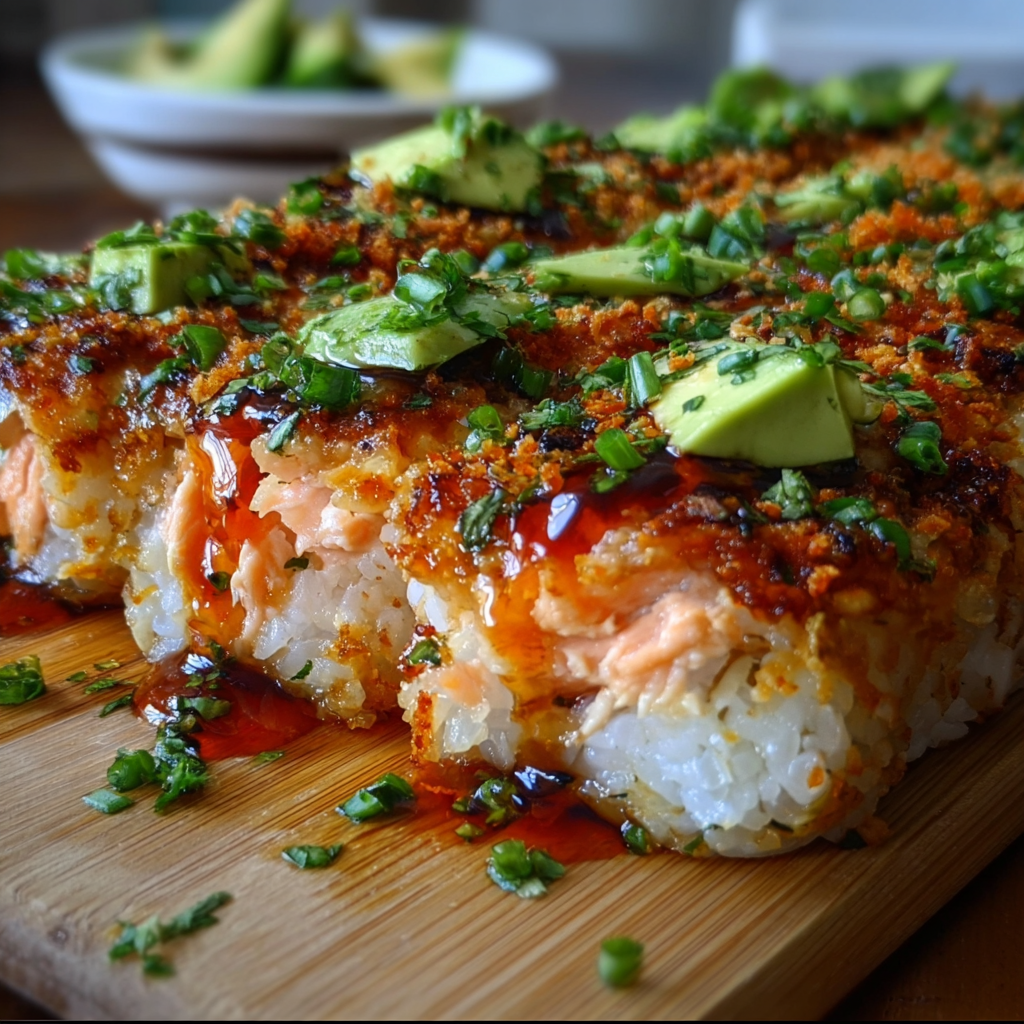
Delicious Salmon Sushi Bake Recipe
Ingredients
- 2 cups sushi rice
- 2 ½ cups water
- ¼ cup rice vinegar
- 2 tablespoons sugar
- 1 teaspoon salt
- 12 oz cooked salmon, flaked
- ½ cup cream cheese, softened
- ¼ cup mayonnaise
- 1-2 tablespoons sriracha (adjust to desired spice level)
- ½ cup panko breadcrumbs
- 1 tablespoon sesame oil
- 1 avocado, diced
- 2-3 green onions (scallions), finely chopped
- Eel sauce or sweet chili sauce for drizzling
- Salt to taste
Step-by-Step Instructions
- Start by rinsing the sushi rice under cold water until the water runs clear. This step is super important for getting that perfect texture. Combine the rinsed rice with water in a pot and cook according to the package instructions or just pop it in a rice cooker if you’re lucky enough to have one!
- While the rice is cooking, grab a small bowl and mix together the rice vinegar, sugar, and salt. Stir until they’re dissolved. Once the rice is done, gently fold this mixture into the warm sushi rice. Also, add the sesame oil and mix it well. Set it aside to cool slightly while we prep the salmon goodness.
- In a medium bowl, combine the flaked cooked salmon, softened cream cheese, mayonnaise, and sriracha. Mix everything together until you have a smooth and creamy consistency. Taste it and adjust the sriracha to your desired spice level—I usually like to keep it spicy yet balanced!
- Now it’s time to heat things up! Preheat your oven to 375°F (190°C) and lightly oil a baking dish (around 9×9 inches should do). Spread that seasoned sushi rice evenly at the bottom of the dish to form your base.
- Next, spread your comforting spicy salmon and cream cheese mixture over the rice layer. This is going to be the best part, trust me!
- Sprinkle panko breadcrumbs evenly on top for a nice crunchy finish. It gives that extra texture that I just adore.
- Pop it in the preheated oven and let it bake for about 15-20 minutes until it’s bubbling and golden brown. If you want it extra crispy, turn on the broiler for the last 2-3 minutes, but watch it closely so it doesn’t burn!
- Once it’s out of the oven, let it cool for a few minutes. Then, garnish with fresh diced avocado and chopped green onions. For that finishing touch, drizzle some eel sauce or sweet chili sauce over the top.
- Slice into squares and get ready to enjoy!
Practical Tips for Success
- Make sure to rinse your sushi rice well—this is the secret to preventing mushy rice!
- For an even better flavor, let the rice sit after cooking before folding in your vinegar mixture. Patience is key!
- If you prefer a cold dish, you can also make this sushi bake ahead of time and refrigerate it before serving. It’s just as delightful cold, so you can enjoy it at your leisure.
- Store leftovers in an airtight container in the fridge for up to three days. Just reheat in the oven or microwave, and you’re good to go!
Equipment You’ll Need
Before you start cooking, make sure you have these handy:
- A pot and a rice cooker (if you have one for convenience!)
- A mixing bowl for the salmon mixture
- A spatula for spreading
- A baking dish (about 9×9 inches)
- A whisk or fork for mixing
- A knife for slicing the avocado
Frequently Asked Questions
- Can I use raw salmon for this recipe? Yes, you can! Just make sure it’s sushi-grade if you’re eating it raw.
- Is there a gluten-free option for this recipe? Absolutely! Use gluten-free panko breadcrumbs and check your soy sauce and mayonnaise for gluten-free options.
- How do I store leftovers? Keep any leftovers in an airtight container in the fridge for up to three days.
- Can I make this vegetarian? Yes! Replace the salmon with roasted veggies or tofu for a vegetarian delight!
- What can I serve with my sushi bake? You can pair it with a simple salad or some miso soup for the ultimate sushi experience!
Join the Fun!
I really hope you try this delicious sushi bake and enjoy every bite! If you made it, I’d love to hear how it went and see your creations! Share your experience by following me on Pinterest, where I’m always pinning delightful recipes that spark joy in the kitchen. Happy cooking!
